Study Background
What is Hypertension?
Resource Information
Patient Resources
National DNA repository
Recruitment Procedures
Acknowledgements
Contact us
Genome Screen Results
Investigators
Nursing and Scientific Teams
|
|
|
start
page |
register
| log-in | software
Standard operating procedure
Venepuncture No: 008D
1. Introduction
Blood sampling is a necessary requirement to assess the biochemical
and haematological profile of subjects who enter clinical research
studies. Risks to the subject from the procedure may include
discomfort, bruising and infection. It is therefore vital that
the technique be carried out efficiently by competent physicians
or trained research nurses.
2. Responsibilities
Physicians and research nurses who have attended and successfully
completed the appropriate training session are responsible for
blood sampling of subjects.
3. Equipment
- Tourniquet
- 21G butterfly
needle (preferably) or 18G green needle
- Alcohol
impregnated skin wipe (mediswab)
- Vacutainer
/ syringes
- Becton-Dickinson
vacutainer blood tubes/bottles
- Micropore
- Materials
tray (disposable or autoclavable)
- Sharps
bin
- Disposable
gloves (recommended - but optional)
- Cotton
wool balls or gauze squares
- Plasters
- Chair
or couch
4. Method
All specimens
of blood should be taken using a good aseptic technique. The
following information should provide some guidance to those
individuals who are less familiar with the standard procedure
and revision for those already competent. All blood (like bodily
fluids) should be considered potentially infectious and handled
accordingly.
4.1
Preparation of materials
- A designated
area will have been assigned for all blood specimens to be
taken. All blood should then be taken in that area only.
- In accordance
with local practices and local rules, adequate protective
measures must always be taken when sampling. A protective
coat or overall must be worn to protect personal clothing
and use of disposable gloves is highly recommended.
- Wash
your hands prior to commencing the procedure and apply a pair
of correctly fitting disposable gloves.
- Check
whether there are any special conditions required for the
test, for example fasting. Ensure the subject has adhered
to these requirements.
- Place
in the tray the correct amount of blood tubes, vacutainer
/ syringes and needles for the entire procedure. Remove any
outer wrappings.
- Take
the tray and sharps bin to the subject.
4.2
Preparation of subject
- Ensure
the subject is sitting comfortably on a chair or lying back
on a couch. Subjects who have previously reported fainting
or are likely to do so MUST lie down.
- Ask the
subject whether they have ever had any problems giving a blood
sample before and if so, what was the difficulty. Any major
problems should be discussed with the medical co-ordinator
before continuing.
- Use the
non-dominant arm (if possible), however, if ambulatory blood
pressure recordings are being made, it is preferable to do
these on the non-dominant arm. The dominant arm must then
be used for the venepuncture.
- DO NOT
use the same arm for both blood sampling and either ambulatory
blood pressure or manual blood pressure measurements.
- Explain
to the subject what you intend to do prior to commencing the
procedure.
- Ensure
their arm is firmly supported, either on the couch or arm
rest.
- Ensure
that there is adequate light over the arm. If necessary an
artificial light may be used for illuminating the area.
- Sit on
a chair or kneel parallel to the arm requiring venepucture.
Place the tray with the materials required between the arm
and yourself.
- Instruct
the subject to remove any clothing from the forearm and sufficient
of the upper arm to allow a tourniquet to be applied.
4.3
Finding a suitable vein
- Apply
the tourniquet to the upper arm. It should be moderately tight,
the radial pulse should still be palpable. (If the tourniquet
is applied too tightly it can affect the serum calcium and
coagulation results obtained.) Look for a suitable vein in
front of the elbow. The best veins for venepuncture are usually
found in the antecubital fossa (inner elbow), cephalic/basilic
or median basilic veins are best as there are few nerve endings
there. See figure 1, for a diagram illustrating the veins.
- If a
suitable vein cannot be found in that area, a vein lower down
the arm may be used. However, these veins are usually smaller,
more mobile and are significantly more painful to take blood
from.
- If the
veins are not very visible after applying the tourniquet it
may be necessary to remove it and ask the subject to warm
their arm. Warmth increases blood flow to the veins and may
therefore make them more visible. The subject should be instructed
to warm their arm by placing it under a warm running tap or
by rubbing both hands together. Encourage the subject to check
the water temperature prior to placing their arm under the
tap.
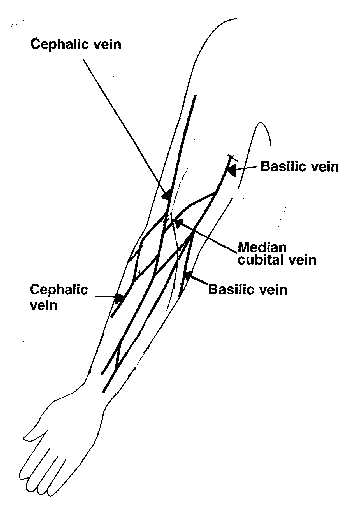
Superficial
veins are the best for venepuncture as they lie just beneath
the skin. The median cephalic and basilic veins in the antecubital
fossa are ideal veins. They are easy to palpate and visualise,
and are well supported by muscular and connective tissue, enabling
venepuncture in this location to be more successful.
A good
vein for venepuncture should hold some of the following characteristics:-
| Bouncy |
Soft |
| Refills
when depressed |
Visible |
| Has
a large lumen |
Is
well supported |
| Straight |
|
Veins
to avoid are those which are bruised, hard, mobile, thin or
those near bony prominences.
- A blood
pressure cuff applied to the arm and inflated to 60mmHg, may
also aid the procedure instead of a tourniquet.
- Tapping
the skin lightly over the place you expect to find a vein
and instructing the subject to clench and unclench their fist
in a rhythmic manner may also facilitate finding a suitable
vein.
5.4
Venepuncture procedure
- Ensure
both the subject and you are in a comfortable position and
everything you need is within easy reach.
- Clean
the skin over the vein using an alcohol impregnated wipe and
allow the alcohol to air dry (residual alcohol may hurt the
subject on venepuncture and may also affect the results of
the blood specimen).
- Using
one hand draw the skin towards the subject's hand so that
the skin is tight. With your other hand hold the wings of
the butterfly needle together (above the needle) using your
thumb and index finger. Pinch the tubing closed between the
third and fourth finger. (If using a syringe and needle, hold
the needle in such a way that it is in line with and above
the vein.) Insert the needle, ensuring the bevel is in the
upwards position, through the skin into the vein.
- Filling
of the plugged butterfly tubing or needle tip indicates that
the needle has entered the vein. If using a needle and syringe
hold the needle end of the syringe firmly with one hand, collect
the correct amount of blood and then place it in the correct
blood tubes / bottles.
- Using
the butterfly needle, keeping the tubing clenched, apply a
piece of micropore over the needle wings (these should be
opened up and lying over the skin surface). This secures the
needle in place whilst the blood is taken. Unclench the tubing
and allow the blood to flow to the stop plug. Clench the tubing
again, remove the plug and attach the vacutainer connection
/ syringe securely. Collect the required volume of blood into
the designated vacutainer blood tubes. Replace each new tube
as required.
- If using
syringes, ensure that the syringe piston, is pulled back slowly
with one hand in a steady motion. Over-vigorous pulling may
cause the vein to collapse. Ensure that the subject remains
relaxed and keeps the arm supported. Sudden jerks may allow
the needle to dislodge from the vein and should be avoided.
- Release
the tourniquet as the blood begins to flow into the blood
bottles. Most subjects will not need the tourniquet on after
access to the vein has been established. If the blood does
not flow keep on some pressure / tightness of the tourniquet.
Each subject will be different, be confident with the tightness
of the tourniquet and apply it as necessary for blood flow.
Pressure of the tourniquet can be painful, ensure to keep
the subject as free from pain as is possible with this procedure.
- When
the correct volume of blood has been collected, remove the
tourniquet completely. Remove the micropore off the butterfly
wings. Apply a clean, dry gauze or cotton wool dressing over
the needle tip. Remove the needle and then apply pressure
on the puncture site (applying pressure before removing the
needle will cause pain/discomfort to the subject). Ask the
subject to apply the pressure and elevate the arm slightly
- this potentially minimises bruising. DO NOT allow the subject
to bend their arm as this may potentially cause a haematoma.
- Remove
the needle from the vacutainer / syringe and place it all
in the sharps bin. If the vacutainer system was not used,
the blood should be placed immediately into the appropriate
tubes.
- Some
tubes may need to be inverted, such as those containing lithium/heparin.
Invert gently as vigorous shaking destroys the blood composition.
Ensure the correct volume of blood is placed in the correct
tubes.
- Label
the tubes as required and place those that need cooling in
the appropriate place. Samples requiring centrifugation should
be collected and spun down in the centrifuge at the desired
temperature, speed and time duration. Some samples will need
to clot and should be left for approximately 40-50 minutes
pre-centrifugation. See blood tube identification and sample
preparation SOP 009, for more details.
- After
a few minutes remove the dressing from the subject's arm.
If requested or required by the subject apply plaster to cover
the puncture site. If bleeding persists re-apply the pressure
and repeat this process a few minutes later.
- When
you are satisfied that the bleeding has ceased, the blood
tubes have been clearly labelled and all the other materials
have been disposed of in the appropriate manner, the procedure
is complete.
- The subject
is free to leave, having been thanked for their assistance.
- Wash
your hands after all the blood tubes have been stored away.
5.
Additional Information
- If the
subject feels faint during the procedure, STOP immediately.
Lie the subject flat and elevate their legs. Stay with the
subject until they feel well again. Arrange to take the blood
sample at a later time or date. If fasting bloods are not
required, ensure that the subject has had a snack/drink prior
to the procedure.
- DO NOT
take blood through a skin lesion or open wound.
- Arterial
blood is brighter and flows more easily than venous blood.
If you accidentally puncture an artery press firmly over the
puncture site for 5 to 15 minutes after removing the needle.
- Ensure
that all sharps are placed immediately into a designated sharps
bin and all blood samples are labelled with the correct subject
details.
- Accidental
puncture wounds should be dealt with IMMEDIATELY. Encourage
the puncture site to bleed whilst held under a cold running
tap, for at least 5 minutes. Seek medical advice from the
research co-ordinator and comply with any local rules for
needlestick injuries.
- DO NOT
take any more than 80mls of blood at any one time.
- The tourniquet
should not be applied for longer than 1 minute. If sufficient
blood has not been collected in this time, it should be released.
The subject should be encouraged to clench and unclench their
fist for a few minutes (whilst elevating their arm above their
head). Depending on the volume of blood still required, it
may be necessary to reapply the tourniquet to gain the requisite
amount.
- Some
blood tests are affected by diurnal rhythm, it is up to the
physician/research nurse to be aware of this.
- Clotting
times often vary between individuals, so the time the subject
needs to put pressure over their puncture site may be different.
Subjects taking warfarin therapy need to apply pressure for
a longer period and are more likely to bruise.
6.
Reference Documents
1.
Safe working and the prevention of infection in clinical laboratories
- model rules for staff and visitors, HSE.
2.
Safe working and the prevention of infection in clinical laboratories,
HSE.
3.
Phlebotomy for nurses - guidelines for practice, The Royal Hospitals
NHS Trust.
|
|
|
|